We use cookies to enhance your browsing experience. By clicking "Accept", you consent to our use of cookies. Read More.

[00:00:00]
Hey everybody. Hope you’re all doing good today. I’m Mahashree, Product Marketing specialist at Unstract, and I will be the host for the session. Now, before I get started, here are a few ground rules that we’d like to follow in this webinar. So firstly, all attendees in this session will automatically be on mute In case you have any questions, do drop them in the Q&A tab at any time during the session, and our team will be able to get back to you with the
[00:00:30]
answers via text.
Now, you can also use the chat tab to interact with fellow attendees, and this is where you let us know in case you run into any technical glitches during this webinar. As a final point, you’ll be redirected to a feedback form once this webinar gets over and I request you to leave a review over there to help us improve our experience going forward.
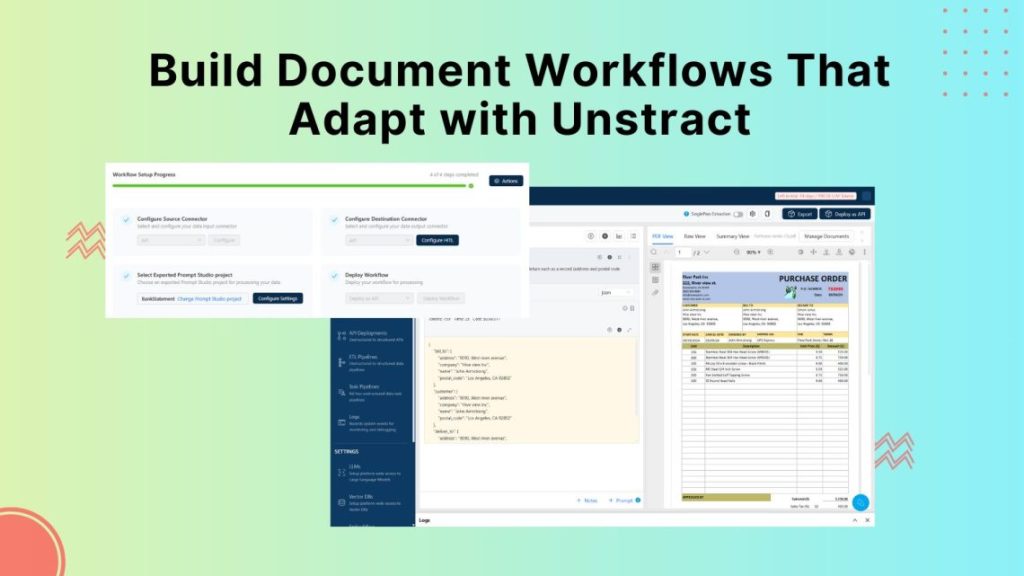
So that said. As the title indicates today, we’re talking about architecting document workflows that adapt to dynamic
[00:01:00]
processing needs. So we’ll go over how you can enable document workflows to evolve with business needs. What are the various capabilities supported by Unstract and how to deploy them? So to give you a, a clearer idea of how the session would flow, we’ll start off by covering what are the challenges of static document workflows to set the stage so we have an idea of what are the pain points we’re looking to tackle with the adaptive capabilities.
That will be followed
[00:01:30]
by the introduction of Unstract’s Adaptive features that is, that are the customer data parameter, post-processing, webhook, and prompt chaining. We’ll be looking at use cases under each of these capabilities and we’ll also take a look at how they function in action. Using an Unstract demo segment.
So this will be the core chunk of this session before we conclude with a session summary and a conclusion outlining everything that we covered and the benefits of these
[00:02:00]
capabilities. And finally, before we wrap up the session, we’ll also have an interactive Q&A where one of our experts will be on air to take your questions live.
So that said, what do we mean by static document workflows and what are the challenges that come with them? Now static document workflows are designed to meet a business’s document processing requirements at the time in which they are set up, which means that all of your business rules, conditions, and assumptions at the time of
[00:02:30]
setup are baked directly into the workflow from day one.
So if you’re using LLM enabled workflows, these rules and conditions would be baked directly into your prompts. However, the challenge is that business rules are constantly evolving. So with the static workflows that starts, this starts becoming a problem because these rules are pretty rigid in static workflows.
They do not change or adapt with time. So the logic basically starts polluting the, the prompts and the
[00:03:00]
prompts no longer focus purely on data extraction, but they start handling validation, transformation, and conditional checks as well. Which makes them fairly large and clunky. And with the new rules, you’ll have to edit or add the new rules to the already large prompt, which makes it even more difficult for maintenance in the long run.
So over time, it also impacts the accuracy because long, uh, prompts with validation and transformation tightly coupled in them could also produce
[00:03:30]
inaccurate outcomes. So this is again. Where in many cases it leads to partial or even complete end-to-end workflow rewrites. So this is why static workflows fail, because not because they’re wrong, but because they cannot adapt to change safely.
What would make this much easier is a modular composable approach where extraction business context and post-processing logic, like validation and so on, are
[00:04:00]
handled in separate interchangeable pockets instead of one tightly bound block. So let’s understand this by taking a look at two different kinds of workflows.
So traditionally we could go for the static workflows where we have clunky prompts, or we could go for the composable workflows where we have the different components of a prompt, uh, separated into different modules. So on the left hand side, we have the clunky workflow
[00:04:30]
where you can see that the document flows in, and the prompt basically has a mix of data extraction, the logic behind the extraction, what are the business rules, what are the conditions for validation?
All of that specified within the single large prompt. And then it is sent for routing and integrations. Whereas with the composable workflow, we have the documents and then we get the context. So what is the context that we’re looking to send to the prompts? So this can facilitate runtime context, and then we send it to the prompts where the
[00:05:00]
prompts specifically and only focuses on the data extraction logic from the documents.
And once you get the data out, you can send it to a post-processing system that validates and makes any transformations necessary to the data. Before routing it to, uh, downstream operations. So.
Under each of these stages, let’s say if I have to make an edit to the validation stage, maybe I want to validate the data differently. I do not have to
[00:05:30]
disturb the data extraction or the context fetching stage. I can immediately just go into this pocket over here, change, make my changes over here, and that wouldn’t impact any of the other aspects of the workflow.
Whereas in stock contrast. With the static workflows, if I have to make changes in the validation details or conditions, I’ll have to make changes in the lengthy prompt, which could sometimes impact other sections of the prompt, and I will have to constantly keep testing this prompt and rerunning this
[00:06:00]
workflow in order to get the right output.
So these are the kind of challenges that we’re able to op overcome with composable workflows. And in the next segment, we will take a look at how Unstract facilitates certain features that can really help you create adaptive composable workflows. Now, before I get into those segments, just for the sake of those that are completely new to Unstract and with us today in this webinar, let me quickly introduce Unstract to you, what we do and uh, what this platform is
[00:06:30]
all about.
So Unstract is an LLM powered unstructured data ETL platform. And if I had to briefly lay out the capabilities of this platform, I could put it into three major segments. Firstly, the text extraction phase, the development phase, and finally the deployment phase. So the first set of functions that happen within Unstract is text extraction.
So you upload your documents into the platform for data extraction, and what happens is the platform
[00:07:00]
deploys a chosen text extracted tool of your choice to extract the raw text from your document and prepare it into a format that is LLM ready. So you can integrate with multiple text extractors that the platform has to offer and that you can connect with.
However, the popular choice we see among our customers is LLMWhisperer, which is known to be a powerful text extractor pre-processor, and it creates documents into a raw LLM ready format. So
[00:07:30]
LLMWhisperer is also Unstract’s in-house text extractor tool, which is why it probably goes very well in hand, in hand with Unstract.
As well, and depending on the user’s needs, we also see a lot of users go for the standalone application of LLMWhisperer that can be deployed as well. So once you extract the raw text from your documents, the second stage is where you extract the data. So this is the development phase where you develop the prompts in a prompt
[00:08:00]
engineering environment called Prompt Studio.
So your prompts are going to mention two key details. That is what is the data you’re going to extract, and also what is the schema of extraction? Now, ideally, the prompt should only be addressing these two key details. What is the data and what is the schema? That is basically the extraction logic, but with complex business scenarios, we are seeing that a lot of businesses are factoring in conditional logic.
So they are factoring in if the data is, uh,
[00:08:30]
let’s say the type of business is an SMB, then I want a different set of operations to be done. If the type of, um, a business is an enterprise, then I want different set of operations to be done or the data to be handled differently. So there are various conditions that come into play in the day-to-day when you’re actually looking to write these prompts.
And that is specifically or precisely where. The composable architecture comes into the picture, and with the adaptive features, this becomes more and more possible and easy, and that is going to be the main focus of our webinar today.
[00:09:00]
So now before I wrap up the development phase, the prompt studio also comes with multiple accuracy, enabling capabilities and cost saving capabilities.
So once you enter all your prompts, whether you’re using the adaptive features or not, once you enter all your prompts and you get the data extracted, you’re happy with how the data is getting extracted from the uploaded documents. You can now deploy your prompts to your project in any of the options that we have over here under the deployment phase.
So it could be deployed as an API pipeline, an ETL Pipeline
[00:09:30]
task pipeline. A human in the loop or a human review deployment. And even in certain advanced cases, we suppose, uh, I mean, we support innate workflows where Unstract or LLMWhisperer can be deployed as a node. And we also have Unstract and LLMWhisperer MCP servers if you’re working with MCPs.
So depending on your business needs and how you are going to be using the prompt Studio project, you can deploy it. Choose from the various options that we have over here. And finally, just to throw us a
[00:10:00]
few numbers on the platform and where it stands today, currently we have 6.1 K stars on GitHub, a thousand plus members Slack community, and we’re currently processing over 9 million pages per month by paid users alone.
So Unstract comes in three different editions. We have an open source offering for those of you that want to explore the platform on your own. However, this does come with its limited capabilities. If you’re looking to access the end-to-end capabilities of the platform, you can either go for the cloud
[00:10:30]
version or the on-prem deployment as when it comes to LLMWhisperer.
LLMWhisperer is also available as a playground where you can, uh, where there’s a generous offering of the end-to-end capabilities and you can test how, uh, it extracts the text from your documents, uh, and you can upload up to a hundred sample. Pages per day for free and test the end-to-end capabilities to see how it works for your unique business documents.
And if you are looking to go for the paid version of
[00:11:00]
LLMWhisperer, uh, you could deploy it as an Python client, a JavaScript client, or again, as I mentioned earlier, you could deploy it as an innate node or an NCP server. And again, both these platforms are compliant with all the major regulations like ISO, GDPR, and HIPAA.
And with that folks, I’ve quickly covered what Unstract is all about and uh, we also looked at where we find the need for adaptive capabilities. So let’s take a look at what they are. So over
[00:11:30]
here I have three adaptive capabilities we’ll be exploring today. The custom data parameter, the post-processing webhook and prompt chaining.
So each of these features enable composable architecture at different stages of your document workflow. We’ll start off with the custom data parameter. Now sometimes while processing documents, you might want to use dynamic lookup values or reference data from your internal systems. So these systems could be
[00:12:00]
your CRM databases, a local file or anything.
But from these internal systems, there might be certain lookup values that you want to factor in your prompts, which will have an impact on the final output. So to access these values is exactly where we need a custom data parameter. So what this does is that it lets you attach any JSON object in your API deployment call, and the data becomes available inside your call during runtime of the document of,
[00:12:30]
I mean, during the runtime of the prompt as a dynamic input.
So we’ll take a look at how the prompts actually look. So, um, as you can see over here, folks, we have two different prompts. One uses the custom data parameter and the other has a static prompt. So if you look at the static prompt, what this prompt basically is looking to do is with this prompt, we are looking to extract some shipment details from a shipment report.
And, uh, we’re basically looking to
[00:13:00]
see if the total shipment weight falls under the threshold limits of 30 and 70. So the minimum is 30 and the maximum is 70. And you can see that we’ve also mentioned the customer account number, the route. So what is the origin and the destination? We’ve mentioned all these details.
Um, as data points in this particular prompt. So while this prompt would work perfectly well for this particular use case of this particular, um, customer account, so what you could foresee is
[00:13:30]
that this prompt wouldn’t. Scale for different customer accounts or when the threshold values change. So let’s say that with time, I desire to change the threshold values and I desire to change the minimum from 30 to 40.
So when this change happens, what I would have to do is. Not only do I have to update this change in my database or wherever I’m storing these values, I’ll have to come back to my document workflow and update the prompts as well. So this actually adds onto the checklist of things your uh, team has to
[00:14:00]
do, and this again, increases the maintenance that is required for these prompts.
Moreover, let’s say that I want the same details to be checked, but not for this customer, but for a different customer who might even have different threshold values. In that case, I will have to duplicate the exact same prompt, use up more tokens, and I would have to add, uh, a different prompt, which is very similar with just the key details highlighted over here that would change.
So this has a lot of, uh, rerunning of the pipeline
[00:14:30]
and duplication of prompt and increased maintenance, which can be quite, um, difficult in the long run. So what we have over here with custom data parameter is that we are not specifying any particular value at all. Rather we are using data variables. So you can see that there is a certain syntax for you to follow, which is you have custom underscore data.
Followed by the variable name, which you will be attaching in your API calls. So when this particular prompt
[00:15:00]
is triggered through an API, it fetches these details as, uh, from your local internal systems. So you have the account number, the origin, the destination over here, and the threshold. It’s also fetched from a component.
It’s also in modular architecture. So it’s, it’s fetched from an internal system and it’s enough if you have to change the values over there and it automatically gets reflected in your document workflows. So we’ll take a look at how this actually functions
[00:15:30]
and, uh, before that. We, we saw how this second prompt that you see over here is useful, not just for this particular use case, but let’s say if I have a different account number, then I just have to feed a different account number with my API call, and I would have the, uh, different minimum and maximum threshold values updated accordingly based on what I have in my database or my internal systems.
So this makes it a lot more easier. I do not have. To, uh, you know, uh, duplicate my prompts or perform any
[00:16:00]
reruns. And the runtime context that the prompt gets is very easy to get, and it’s, it’s more functional and useful in the long run. So before we take a look at how this works in, uh, untraced using, uh, you know, how it actually works in action, let’s take a look at what are some other use cases where we see the need for the custom data parameter.
So with the previous example, you saw how it is useful, especially when the clients change. However, that is not the only
[00:16:30]
parameter that we usually see changing. Sometimes you might have to process. Uh, your documents differently based on the region, the policies, the industries, and so on. So it has a wide range of application.
It avoids over branched pipelines, it’s composable and reusable across use cases. Now let’s go into the Unstract platform and we will see how we can actually put the custom data parameter to use. So I’ll be moving into the
[00:17:00]
Unstract platform folks. And what you see over here is the Unstract interface. Now, currently we are in the prompt studio, and, uh, if you were logging in for the first time into the platform, what you would have to do is set up your prerequisite connectors, that is, that are your elements, vector dbs, embedding models, and text extractors.
So, uh, these are certain prerequisites that you will need to even get started with the platform. So, you know that Unstract is an LLM powered, um, uh, tool. So you have the [00:17:30]
various LLMs, popular LLMs out there in the market over here. And, uh, you can set up connections with multiple models. Same goes with vector dbs, embedding models and under text extractors, where you’d also find LLMWhisperer.
So with that quick detour, let me go back to the prompt studio projects and we’ll take a look at how the custom data parameter works. So in this particular, um, demo, I’ll be going into an existing prompt studio project that I. Where I have basically uploaded a shipment document,
[00:18:00]
and I am looking to extract the exact same details that you’ve seen in the prompt earlier.
So as you can see in this particular prompt that I have, we have the prompt where I have specifically, this is a static prompt that you’re seeing. I have specifically mentioned what is the customer account number? What is the origin and the destination of the route? And I want to calculate the total shipment value.
And, uh, that would be the sum of the chargeable weight on this document. And check if the total shipment weight
[00:18:30]
is between 50 and ad kgs. And if so, it would re, it would return the status as positive, and if not, it would return the status as negative if it falls out of the threshold. So as you can see, I’ve run this particular, um.
Prompt on my document and I have output. Over here you can see that the total shipment weight was 70. However, my threshold values say 50 and 80, which basically falls within the threshold value, and I have the status as positive. So it’s great. It’s working pretty well.
[00:19:00]
But now let me call the same prompt and we rewrite the same prompt, but I would be using custom, uh, data parameters instead.
So for that, I’m gonna be creating another prompt and for the want of time, I’ve already written this prompt over here. I’m gonna be copying it and pasting it, and you will see the difference between the two prompts. Alright. So, as you can see in this particular prompt, if I have to compare the two, I’ve replaced the custom, uh, the
[00:19:30]
customer, um, account number with the, uh, variable.
So this is the custom data parameter through which I’m passing the variable. And the same goes with the origin and the destination of the route. And I’ve also set the minimum and maximum thresholds as a custom data parameter along with the unit. So you can see six different custom data parameters that I’ve used in this particular prompt.
So what this enables me with is that I can pass these values during runtime, depending on the
[00:20:00]
customer that I’m working with, and it would be able to easily detect the values. Now, for the sake of testing this within the prompt studio, let me show you how this is done. So if you go in those settings, you would find a custom data tab over here where you can define the different.
Uh, variables that you would be using in your prompts. And you also define, uh, I mean you also include an JSON object that you would be using to test this particular prompt in the prompt
[00:20:30]
studio. So this is basically how the JSON object would look even when you’re calling this particular prompt using an API.
So as you can see, we have the route the origin is given as New York Destination, London. It’s basically this. Same details that you saw on the static prompt. However, we have that given over here as a JSON object, and let me just run this prompt for you and you will see how the prompt is able to fetch the output.
All right, so we
[00:21:00]
have the same output over here. The status is given as positive. We have the maximum threshold, 18, minimum 50, and the total shipment rate as 70. Now, let’s say that this is the setup that I have for a while, and then my business decides to change the threshold values. So let’s say that in my database I update the minimum value to be 10 kgs.
And I want the maximum value to be 20. So I want the, um, shipment to wait for this particular customer to,
[00:21:30]
or this particular customer account number. And I want the different, uh, I mean, I want to change the threshold. So I’ve changed it in my database. And once I do that. I just have to now let me run the particular workflow again.
Now I’ve made no changes to either of these prompts. The previous static prompts stays the same while, uh, the same is true with the, um, dynamic prompt that we have with the custom data parameter. Now, when I run this particular. Workflow, you can
[00:22:00]
see that I have updated the minimum and maximum values over here, and it automatically reflects in the custom data in the prompt that uses the custom data parameter.
And I have the status over here as negative because the total shipment rate falls out of, uh, 70 kgs. Whereas if I fail to update the static prompt over here, which I have not, since I’ve used the exact values as they are. You can see that I still get the status as positive. So this kind of hints at the
[00:22:30]
kind of, um, implications that your business might face if you fail to update the prompts in time.
So that is one of the, uh, this is something that you can save your business from when you use dynamic, uh, features like the custom data parameter. So with that folks, we took a look at how the custom data parameter look, uh, works. And, uh, let me move back to the, uh, presentation.
Alright, so while the custom data parameter is
[00:23:00]
an adaptive feature that is used before data extraction, the post-processing webhook, which is the next feature that we are looking at, facilitates adaptive capabilities right after data extraction. So instead of consuming raw output, JSON directly from the extraction or whatever output that you get.
The Prompt Studio sends the output to a webhook endpoint where a quick additional logic can be applied to this output before the data is finalized. So
[00:23:30]
this web hook can execute custom logic on the extracted data, like validation, transformation, enrichment calculations, or integration with external systems.
And based on this logic, it can return a clean and enriched output or respond with errors. Flags indicate that the output requires review and so on. So your webhook output can be any of these actions, but it basically gives you space for you to perform a quick
[00:24:00]
interaction with external systems to validate before you get back and send the data down to downstream operations.
So now. I can make these changes and without having to change the prompt at all. So initially what used to happen is when I have these validation and transformation as part of my prompt, I would have to make these changes within the prompt itself. Whereas with. The architecture that I’m, uh, suggesting or proposing right now, we
[00:24:30]
send the validation and post-processing to an external webhook endpoint where this is completely maintainable on its own, and we just facilitate communication between these two components.
That is your extraction logic and the external, uh, endpoint. So let’s understand this by taking an example. And, uh, this is the same example that we’ll be covering in the demonstration of, uh, this, uh, capability in the product as well. So in this example, we are going to be looking at a purchase
[00:25:00]
order use case where we’ll be performing some validation and enrichment from the data that is extracted out of the purchase order.
A common purchase order requirement businesses have is usually comparing the billing address and the delivery address given in the document. So this is an important operation because this comparison could reflect on third party purchases, drop shipping scenarios, and sometimes could even go against policies.
So the reason behind the function could vary, but this remains a requirement
[00:25:30]
nevertheless. And another common business need that we are also going to be doing in this particular use case is to enhance the extracted details of the purchase order with bank information of the buyer. So usually the bank information isn’t present in the document.
However, the raw extraction alone is rarely sufficient for production workflows. You might need to enter it with data like the banking information to prepare the data for ERP or payment systems in downstream operations. So as you can see on the screen folks, you could either
[00:26:00]
integrate all the validation and enrichment rules within the extraction prompt itself and make the prompt long and clunky, which is also, uh, which also risks inaccurate outputs.
Or you could send the extracted data, so you just get the extracted data from the purchase order, and then the external web webhook endpoint takes this data, performs the validation and the enrichment logic. And then sends back the final output, which could be used to route it into downstream operations.
So let’s check out this scenario
[00:26:30]
on Unstract. So lemme go back to my uh, account and I will be exploring another use case for the post-processing web hook.
Alright, so what you see over here, folks, is I have a purchase order over here. You can see that I have some customer details and I have the billing address over here, the delivered address over here. And in this, in this case, both of them match. So, uh, over
[00:27:00]
here, as you can see. I have also entered a prompt to extract the customer, uh, billing and delivering sections, and I want the address as well as the postal quote to be separated.
So I’ve given some instructions on how I want the schema to be, and you can see the address. I mean, you can see the output right here. So we have the billing address, the customer’s address. As well as the delivered address. So all three are the same in this case, and we just have this extracted, but how, so what a static, uh,
[00:27:30]
prompt would look like if I were to include the validation and enrichment details is that I will have to, you know, include, um, uh, another line which would specify to the prompt that I want to compare the.
Output of the billing, the customer and the delivery address to see if they are the same or not. So that can be added in the static prompt itself, but the real challenge arises where I want to include the bank details in this particular prompt. Now, there’s no way for a static prompt to fetch that
[00:28:00]
because that is not given in the document as such.
There are no bank details given over here. So I’ll, basically, what I’ll have to do in, in a more advanced system is I’ll have to probably take the name of this customer and compare this particular customer’s name with my local records and see if I can fetch the banking details from my database or an internal system.
So this is what the post-processing webhook enables you to do. So lemme duplicate this. Let write, let me write another prompt.
[00:28:30]
And again, I have. What I’m gonna be doing is I’m going to be just exactly copy pasting this particular prompt over here. And what I’ll do is I am going to, um, set the output data type as Jason and I already have an post-processing web hook available that I’m just going to copy paste the URL so we have the webhook details over here.
So this
[00:29:00]
webhook basically does the comparison. It performs two major, uh, operations. It basically performs the comparison. It checks whether the um, uh, delivered address and the billing address are the same. And it also checks for the banking details of this particular customer. So let’s see how this particular, um, output looks.
Alright, so as you can see, I have the output, JSON Over here I have the billing address and I have the customer address and the billing, uh, and the delivered address.
[00:29:30]
But the extra, extra details or the extra data that I have is I have a, I have a, a parameter that tells me whether the billing and the delivery address is matched.
So in this case, you can see that it’s returned the value as a true value. And I also have the customer billing info. So I have the bank account number, the bank name, as well as the company name and contact name, which was able, which was able to, uh, be put into the output over here, included in the output using the
[00:30:00]
post-processing web hook.
So if I have to give you a brief idea of how the source code of this web hook looks, so this is a source code that I have in the backend folks. So we have, um, a function over here to compare the two addresses and we get the customer billing address over here. We receive the, uh, web hook and we are also able to fetch the banking details and add them to the, um, output as the customer billing info.
[00:30:30]
So this is how the source code of this particular, um, output looks. And if I also had to show you the. In this case, I’ve com used the source code to, uh, check out the values of the banking values in a CSV file. So it needed necessarily be a database or an internal, uh, system like a CRM or an ERP. It could be as simple as a CSV file.
So you can see that this. Is the customer that we are dealing with. So the system, the [00:31:00]
web hook, using the source code automatically matches the values and I’m able to retrieve the A bank account number as well as the bank name from the CSV file, which again, automatically reflects in my output. So this is the level of.
Um, dynamic, um, workflows that you can achieve and it’s made very easily. It’s brought to you very easily with capabilities like the post-processing web hook, as well as the custom parameter. So let me move back with that. I’ve taken a look. I’ve
[00:31:30]
covered everything that I wanted to with the post-processing webhook.
Let’s go back to the slides and we’ll be covering the final feature for today. That is the, uh. Prompt chaining. So prompt chaining comes into the picture when you need to pass the output of one prompt as the input variable to another prompt within the same prompt studio project. So this approach enables workflows that can reason progressively over documents.
So earlier you
[00:32:00]
might have had to duplicate prompts or reprocess entire documents for multi-stage document workflows. However, with the recent product release, you can refer to the output of any of the given prompts within another prompt using a syntax. This is the particular syntax that we use. So you can see that there are two syntaxes given the prompt.
Key is nothing but the title, um, of the prompt. So you just have to put it in and into the, uh, subsequent prompts if you’re looking to use the
[00:32:30]
output of the previous prompt. So we have two different syntaxes over here. One is. For direct value passing, where you just take the output of the previous prompt as is and you directly send it into the next prompt.
Prompt. So this is ideal when the extracted value is already in the required format and can be reused as is. For example, you’re passing a name and identifier, or a simple field in between prompts, so you do not have to pre-process the output before sending it to the other prompt, whereas the second
[00:33:00]
syntax that I have over here.
Is used when, uh, so basically you have the title of the, uh, prompt whose output you’re looking to use, and you also attach a webhook endpoint. Basically what happens is when you use this syntax, the platform takes the output of the previous prompt and it quickly does a pre-processing. It could enrich this output and then pass it on to the next prompt.
So this is for slightly more complex use cases, and we will see how both of these are deployed in the platform. So with that, let me
[00:33:30]
venture into the demo segment again. And I’ll be taking you into a project that uses prompt, uh, prompt chaining. So the first project that we see we have over here for prompt chaining uses direct passing of the value.
So as you can see, I have a loan application over here. And, uh, just to show you a quick idea of how the LLMWhisperer output output looks, this is the raw data that is extracted. In a layout, uh, preserved format, which will again, be used for downstream operations. So that is what LLMWhisperer does,
[00:34:00]
and these prompts are again, acting on this particular, uh, raw view.
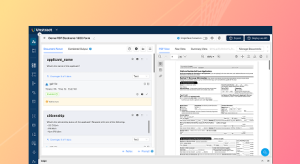
So this is the, basically the version of the document that the LLM sees. So anyways, coming back to the, uh, main picture. So in the first prompt, we are extracting the applicant’s full name, and I have the name over here. And in the second prompt I’m seeing if the applicant name, which is basically the output of the first prompt.
So you can see the title is applicant name, and that is basically the syntax that I’ve passed over here. So I’m just directly taking this value without
[00:34:30]
any pre-processing, and I’m seeing if it appears in the driver license documents on uh, page two and three. So I wanna see if the same name appears on these two documents, because let’s say that I’m getting documents in a particular order.
I have the driver’s license, uh, on pages two and three. So I wanna see if the name of on the application matches. So to perform this, I’ve just, instead of including the name or the actual value over here, I’ve just taken this output. I’ve used the syntax to refer to that output as a variable. And, uh,
[00:35:00]
over here I’ve, uh, asked the prompt to look for the match.
As you can see the name Roger Deacons matches with the first, uh, with the, um, name on page two, however, it does not on page three. So that is exactly the output that you have. Over here on page two, it says Exact match. And on page three it says no match. So this is how you use prompt chaining within pro studio projects.
And if you have to take another look at pro training with the external web hook, I have another use case over
[00:35:30]
here. So in this particular, um, prompt, what we are doing is we are extracting certain booking details. So over here we have the booking number that is extracted from this document along with the, uh, COD number, which is basically through, uh, the total cost that I am required that this person is required to pay.
So what happens is I want to print the result and I’m passing the. Um, output of the previous prompt, uh, which is booking, which is basically the title of the previous
[00:36:00]
prompt, along with an external web hook endpoint. So what happens is it basically takes this output and you have the booking number over here, and based on that number.
The back in the backend, this webhook basically matches that number with my internal records and it looks at the, um, total amount paid by that particular person and the payment date. So it basically enriches the output of this particular prompt. It brings back those details. So I have the, uh, COD amount, I have the booking
[00:36:30]
number, which is what I can basically get the maximum details I can get from this document.
Now with the endpoint, I can take this output from the previous prompt, send it to the external endpoint, and populate the second output with more enriched details like the total amount that was actually paid, when is the payment due? And I can also calculate the amount due. So what the external webhook is doing over here is it’s not only returning the extra.
Data, but it’s also calculating, uh, what is
[00:37:00]
800 minus three 50. So what is the remaining amount? And I have that, those details over here as well. So this folks is the kind of, um, operations that can be achieved with prompt chaining. And not just that, but with, uh, all the, but like with all the other adaptive capabilities together, you can use them in different ways to actually create really complex and powerful document workflows.
So that brings us to the end of the session. We looked at
[00:37:30]
Unstract’s Adaptive Workflow Engine today, and these capabilities when used together can really help in scaling document workflows. So they result in fewer prompts. If we need to briefly take a look at the benefits, we have three major benefits, which was the common theme that we had looked at across, uh, the different capabilities when we explored them.
So they result in fewer prompts because one prompt can now serve multiple use cases without prompt duplication or document reprocessing. They exist as
[00:38:00]
smaller composable logic blocks, so extraction, validation, transformation, and orchestration are separated. Making each piece build easier to build, test and maintain.
And finally, we have clear separated concerns. So your custom data parameter deals with runtime context, the post-processing web hook handles, data enrichment, computation, validation, and so on. And prompt chaining handles the progressive flow of control during extraction. So you can, in the, in the, in today’s session, we looked
[00:38:30]
at each of these features used individually, but you can also use multiple features within the same prompt or in tandem with one another as per your requirements.
So I hope you guys, uh, do sign up for un instruct and check out these capabilities for your. Uh, own unique business needs or an alternative way in which we see our users, uh, approach their document workflows is if you could also sign up for a free personalized demo with one of our experts, and we have the links
[00:39:00]
to all these, uh, demos, whether it’s.
The signup, whether it’s the demo link or, uh, the free trial of LLMWhisperer. So all of this, we, I’ve asked my team to drop the links in chat. You can take a look at it and we’ll be able to sit with you on a one-on-one conversation, understand your specific business requirements, and, uh, we can see how we can, you know, adapt these capabilities for your needs or, um, even other, uh, requirements that you might have that fall out of the, uh, topics that we’ve
[00:39:30]
covered today.
All right. So I see that we have one question over here.
Gokul, would you like to take that?
Yeah.
Uh, so yeah, just to answer the question, right, uh, we do give you the transparency, uh,
[00:40:00]
around the. Extraction cost. Uh, so we’ll be able to help you estimate the cost, but uh, you may have to connect your own API keys, um, so as to use any LLM tokens through the platform. So does that answer your question? I mean.
[00:40:30]
Any follow up questions? Anybody else?
[00:41:00]
All right. Um, looks like we’re good to go. So thank you folks for joining the session today. We’ll be sharing the recording shortly and, um, wait, I think we have one more question. No, no. That’s my answer. Yeah, I think we’re good. Okay.
[00:41:30]
No, I think, uh, we have a follow up question. Oh, okay.
Yeah, I mean, you can connect your models from your foundry. Uh, basically take the API keys from your Azure Foundry, connect it, uh, with an OnTrac. And once you deploy your prompts to your project as a API, uh, you just need to turn on a metadata. Uh, I’m happy to share the links. Uh, a can you look for the, uh,
[00:42:00]
include metadata parameter.
So maybe you can share it with the attendees. Yeah, sure. So, uh, what really happens is you, you get the, uh, extraction LLM cost as a part of the a p response. And in order for you to estimate the total cost, uh, it would, you know, cost you for a particular document type, you just, you may have to just run some five to 10 documents.
And then when you take an average of the LLM costs, uh, you will, you’ll
[00:42:30]
arrive estimate, right. Uh.
So we also show you the number of tokens and the cost as a part of the API response. Once you, uh, process a file through the API you deploy from Unstract.
Cool. Uh, awesome. I think that answered. Anyway, so
[00:43:00]
we’ll be sending out the recording, uh, to all of you guys post this call. Uh, so we look forward to having you, uh, in the future sessions as well. Yeah. Thank you everybody. Thank you Google. Um, thank you everybody. Have a great day.
We use cookies to enhance your browsing experience. By clicking "Accept", you consent to our use of cookies. Read More.
See Unstract in action with walkthroughs of core features and real extraction workflows.
Managed cloud, on-premise, or open-source. Unstract adapts to your infrastructure needs, so choose what works best for you.

Prompt engineering Interface for Document Extraction

Make LLM-extracted data accurate and reliable

Use MCP to integrate Unstract with your existing stack

Control and trust, backed by human verification

Make LLM-extracted data accurate and reliable